How to Create a Service
Video Tutorial
If you prefer video content, this guide is available on our
YouTube channel,
click here to watch it.
A service is a platform (app/website) on which you want to
integrate payments using the Fapshi API. Creating a service
gives you access to a live API key and API user which constitute
parameters for making requests with the API. Check the
API documentation
for more details on this.
To create a service, do these:
Step 1: Log into your dashboard and click the
Merchants dropdown on the extreme left of the
menu bar.
Step 2: Click the "New Service" button.
Step 3: Fill in the required details and confirm.
Step 4: Your apikey and apiuser will be generated and will
appear at the bottom on the dashboard page. Copy and save it
judiciously. The
API documentation
has guides on how to use the apikey and apiuser to integrate
payments.
How to Create an Event
Video Tutorial
If you prefer video content, this guide is available on our
YouTube channel,
click here to watch it.
Creating an event will only take about a minute or even less.
Here are the steps:
Step 1: Log into your dashboard and click the
Events tab on the menu bar.
Step 2: Click the "Create Event" button.
Step 3: Fill in the required details and confirm.
Step 4: Your event code will be generated and you can copy and
share it.
Note
You can share your event in either of two ways:
1. Copy the event code and ask interested persons to search
for that code on
iventily.com or 2. Copy
and share the event link (direct link to the page on
iventily.com). You could as well put both the event code
with instructions and the event link on your event flyer so
clients can book without having to contact you directly.
How to Book an Event on Iventily
Video Tutorial
If you prefer video content, this guide is available on our
YouTube channel,
click here to watch it.
To book an event, do these:
Step 1: Either copy and paste the event code into the search
bar on Iventily and press
enter, or open the direct link to the event page.
Step 2: On the event page, select the category, input your
name, number of spots/tickets, email, payment number and
submit.
Step 3: Confirm payment on your phone and a receipt will be
sent to your email.
Step 4: This receipt will serve as your ticket.
Video Tutorial
If you prefer video content, this guide is available on our
YouTube channel,
click here to watch it.
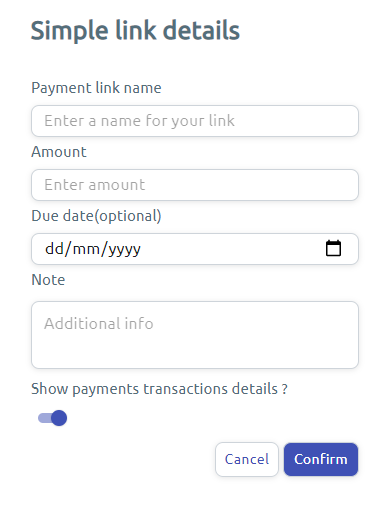
Simple Payment Link
Simple payment links permit you to collect payments by creating
and sharing a link to a payment page. The person receiving the
link just has to fill in their details and pay. Creating a
payment link is simple. See the steps below:
Step 1: Log into your dashboard and navigate to
More > Payments > Payment Link.
Step 2: Click the "Create a link" button at the top right and
select "simple link".
Step 3: Fill in the required details, you should input an
amount. If you want to collect money for contributions, you
should create a
donation link instead. If what
you're collecting money for has multiple fixed prices, create
a variable link.
Step 4: Your payment link would be generated and you can now
copy and share with your payers!
Step 5: When someone clicks on the link, the Fapshi payment
page will be displayed for them to pay.
Step 6: When your client pays, he/she will receive a payment
receipt through his/her email; they can download the receipt.
Note
The minimum amount that can be paid through a payment link
(both simple and donation links) is 500 FCFA.
You could set an expiry date after which no one could make
payments through the payment link.
We charge a fee for payments made through payment links. Visit
our
pricing calculator
to see how much you'll be charged for the amount paid.
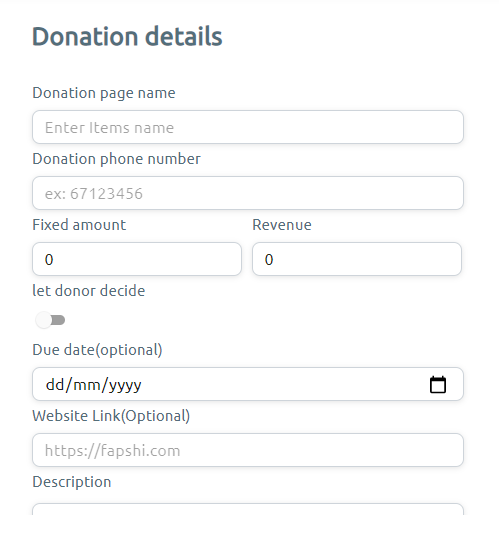
Donation Link
You can use donation links for crowdfunding and all kinds
contribution.
Step 1: Log into your dashboard and navigate to
More > Payments > Payment Link.
Step 2: Click the "Create a link" button at the top right and
select "donation link".
Step 3: Fill in the required details; you can select a fixed
amount for the donation or select the "let the donor decide"
option so the donor can decide what amount to donate. Even so,
you can optionally set a minimum amount for the donation.
If you select the "Show donations" option, donors will be able
to see those who have donated before them, the date/time, and
the amounts they donated.
Step 4: Your payment link will be generated and you can copy
and share with your donors!
Step 5: When donors click on the link, the Fapshi payment page
will be displayed for them to pay.
Step 6: When someone pays, he/she will receive a payment
receipt through his/her email; they can download the receipt.
Variable Link
You can use variable links to collect payments in cases where
there are multiple fixed prices. For example, event tickets
reservation/purchase.
Step 1: Log into your dashboard and navigate to
More > Payments > Payment Link.
Step 2: Click the "Create a link" button at the top right and
select "variable link".
Step 3: Fill in the required details; set the price label and
amount. You can add as many prices as necessary.
Step 4: Your payment link will be generated and you can copy
and share it.
Step 5: When someone clicks on the link, the Fapshi payment
page will be displayed for them to pay. They will see the
various price options to choose from.
Step 6: When they pay, they will receive a payment receipt via
email and can download it to serve as proof of payment.
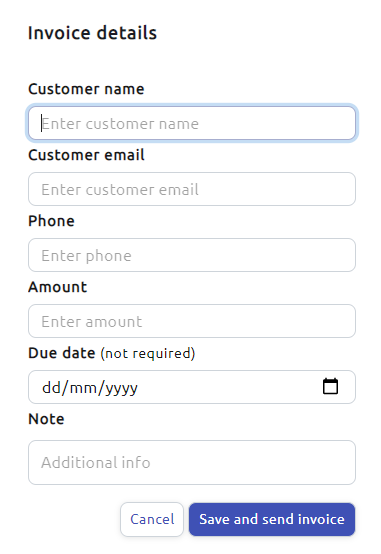
Simple Invoice
A simple invoice permits both you and your client to have proof
of payment. Here's how you would create an invoice:
Step 1: Log into your dashboard and navigate to
More > Payments > Invoices.
Step 2: Click the "Create an invoice" button at the top right
and select "simple invoice".
Step 3: Fill in the required details, you can leave the note
field empty if you don't see the need to leave your client a
message. Should you need to provide more details, such as the
items, their prices, etc, create an
advanced invoice instead.
Step 4: Your invoice would be generated and sent to the
client's email.
Invoicing made simple
We have implemented action items to help you handle
invoicing on Fapshi. The invoice page on your dashboard
displays a list of all invoices you've created, each
having an action button at the extreme right. Click on it
and explore the options! Visit this guide on
how to duplicate an invoice.
Step 5: When your customers click on the payment link on the
invoice, the Fapshi payment page will be displayed for them to
pay.
Step 6: When your client pays, he/she will receive a payment
receipt through his/her email; they can download the receipt.
Note
The minimum total for an invoice (both simple and advanced) is
500 FCFA. Also, you cannot send an invoice of
more than 10,000,000 FCFA.
We charge a fee for invoice payments. Visit our
pricing calculator
to see how much you'll be charged for the amount paid.
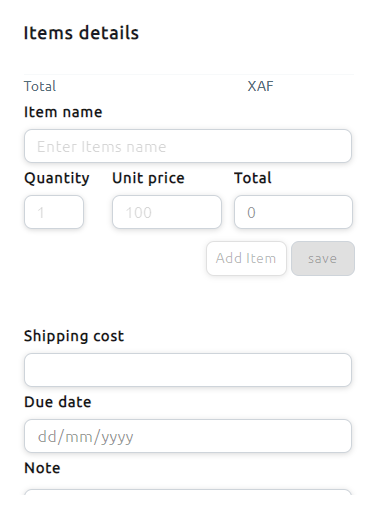
Advanced Invoice
With advanced invoices, you can include as many items as
necessary, their quantities and unit prices to the invoice.
Basically, the advanced invoice conveys more information to the
client. Below are the steps to create one:
Step 1: Log into your dashboard and navigate to
More > Payments > Invoices.
Step 2: Click the "Create an invoice" button at the top right
and select "advanced invoice".
Step 3: Fill in the required details, add and save as many
items as is needed for the invoice. You can leave the note
field empty, if you don't see the need to leave your client a
message. If it is not necesary to include items in your
invoice, create a
simple invoice instead.
Step 4: Your invoice would be generated and sent to the
client's email.
Invoicing made simple
We have implemented action items to help you handle
invoicing on Fapshi. The invoice page on your dashboard
displays a list of all invoices you've created, each
having an action button at the extreme right. Click on it
and explore the options! Visit this guide on
how to resend an invoice.
Step 5: When your customers click on the payment link on the
invoice, the Fapshi payment page will be displayed for them to
pay.
Step 6: When client pays, he/she will receive a payment
receipt through his/her email; they can download the receipt..
Note
If an invoice has been paid for, you cannot edit or send a
reminder for it. However, you can duplicate or resend it.
Check out these actions, how they work, and when to use them
in the guides.
Activating your Account
Activating your account permits you to use Fapshi hitch-free.
We collect this information to comply with requirements from
regulators and financial partners and the
terms & conditions.
To activate your account, do the following:
Step 1: Log into your dashboard and navigate to
Compliance .
Step 2: Fill in the required details and confirm.
Note
For the ID, we only accept "JPG", "JPEG", and "PNG"
picture formats; make sure your pictures are in any of
these formats. If they're not, you could use
this site
to convert them into any of the formats listed above.
Also, please ensure the pictures are clear enough such
that one can effortlessly see the details on them.
Note
Your business name is what appears on your store. Be sure
to use the correct name as you will not be able to change
it later. Also, include a valid physical address where
clients can meet you; ideally, this address will contain a
street (neighborhood) and city. We advice that you put a
phone number that can be contacted on WhatsApp.
Feedback
We usually take less than 24 hours on working days to
verify your details. However, this may vary depending on
the availability of the team. You would receive an email
stating whether the account has been approved or not.
Creating your product
Video Tutorial
If you prefer video content, this guide is available on our
YouTube channel,
click here to watch it.
Here's how you would create a product:
Step 1: Log into your dashboard and navigate to
More > Store > Products.
Step 2: Click the "Add a Product" button at the top right.
Step 3: Fill in the required details; make sure to upload a
picture of your product. You can also add more pictures of the
product by uploading to the product gallery.
Note
On Fapshi, you cannot post products whose prices are less
than
500 FCFA. Also, the following product
names are forbidden, i.e., you can't give your products
these names:
"fapshi", "pending", "invoice", "donation", "payment
link".
Step 4: Your product would be created; you can see its details
on the Products page on your dashboard, from where you can
copy and share its link.
Further Steps
You can add your products to your store (a unified view
for your products). You can also preview your products,
edit, or delete them.
Step 5: When your customers click on the product link, the
product view and payment portal will be displayed from where
they can pay.
Step 6: When your client pays, he/she will receive a payment
receipt through his/her email; they can download the receipt.
Note
We charge a fee for product purchases. Visit our
pricing calculator
to see how much you'll be charged for the amount paid.
Video Tutorials
If you prefer video content, these guide will be handy.
Gathering your products into a store
Anyone who visits your store can add any of your products to
their cart, and place an order. You'll be able to see this on
the "Orders" section of your dashboard.
This is how to setup your store:
Step 1: Log into your dashboard and navigate to
More > Store > Store.
Step 2: Click on the pen icon to edit your vendor (store)
credentials (logo, phone number, address, description, etc).
Step 3: Access your products page and
add products to your store.
Step 4: Copy your store's link and share so your customers can
order your products.
Treat Your Customers Well!
Your customers can review, rate, or report your store.
Their ratings on your store matter a lot because others
will be compelled to buy from you if you're rated high,
hence, endeavour to serve your customers well. Encourage
your satisfied clients to leave a review and rating to
boost your sales. If your store is reported, we will
verify the claims and take appropriate actions. However,
to avoid being reported, serve your customers well!
Step 5: When your customers access your store's link, they'll
be able to add products to a cart and place an order. When
they do so, you will receive a notification on your dashboard
and an email.
Note
Every order placed for products from your store will
appear under the "Orders" section on your dashboard. You
will also receive a notification. You have to confirm the
orders before they can pay. Also, endeavour to deliver
products to your clients in the shortest time possible for
better customer service.
Step 6: Visit the Orders section of your
dashboard to confirm their orders. It is also important that
you discuss with the customer. When you confirm the order, an
invoice will be sent to them. The invoice contains a payment
link. The link will open a portal where they can fill in their
payment details.
Step 7: When your client pays, he/she will receive a payment
receipt through his/her email; they can download the receipt.
Be careful what you post!
If your product(s) is(are) judged to violate our
terms & conditions, we will block your account. You won't be able to
withdraw your funds. So make sure you read and follow our
terms & conditions
on what you can't sell on Fapshi. If your store is
reported, we will freeze your account until you are able
to justify yourself against the claims.
Handling Orders
There's a lot you can do with orders. Some of these are:
-
Confirm an order – when you confirm an order, then
and only then, can the client pay for it.
-
Modify an order – you can modify item quantities, and
unit prices; you can also add items to a client's cart.
- View or delete an order
Here's how to confirm an order:
Step 1: Log into your dashboard and navigate to
More > Store > Orders.
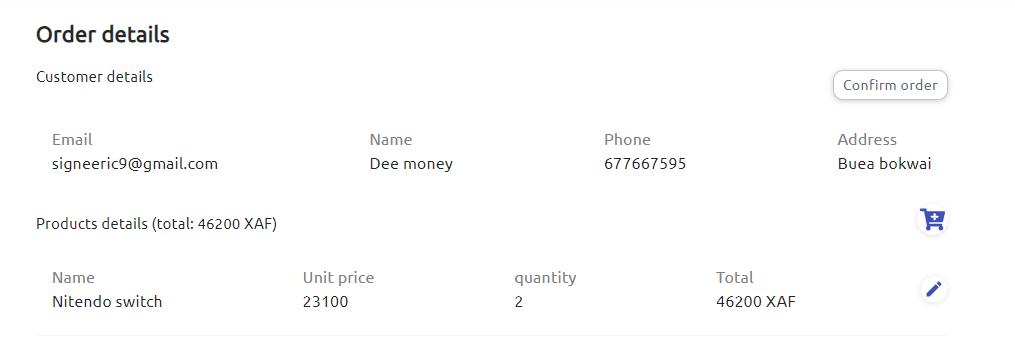
Step 2: Click on the icon with three dots and select view
order to see the details.
Step 3: To confirm the order, click the "Confirm order" button
at the top right.
When you confirm the order, an invoice containing the product
details and a payment link will be sent to them. The link will
open a portal where they will be able to pay.
Step 4: When your client pays, he/she will receive a payment
receipt through his/her email; they can download the receipt.
Lessen work for your clients!
We suggest reducing the purchase process for your clients.
For example, if your customer ordered for two shoes, and
you only have one, you should discuss with the client to
let him/her know. If you two come to an agreement, you can
modify the order directly from your dashboard.
To modify an order, click the pen icon close to the item to
edit its quantity and/or unit price or click the bin icon to
delete it.
You can also add an item to their cart by click on the cart
icon, filling the fields and submitting.
Step 1: Log into your dashboard and navigate to
More > Payments > Transfers.
Step 2: Click the "Make a Transfer" button at the top right.
Step 3: Fill in the required details. Make sure to input the
recipient's email (The email must be that of someone with a Fapshi
account) and your pin correctly. Enter the amount and reason for
transfer and send.
Step 4: The transaction will be processed and you'll be able to
see its details on the Transfers page on your dashboard. Also,
you would notice from the change in your account balance.
Note
We charge a fee for transfers. Visit our
pricing calculator
to see how much you'll be charged for the amount you want to
transfer.
Create an account
Video Tutorial
If you prefer video content, this guide is available on our
YouTube channel,
click here to watch it.
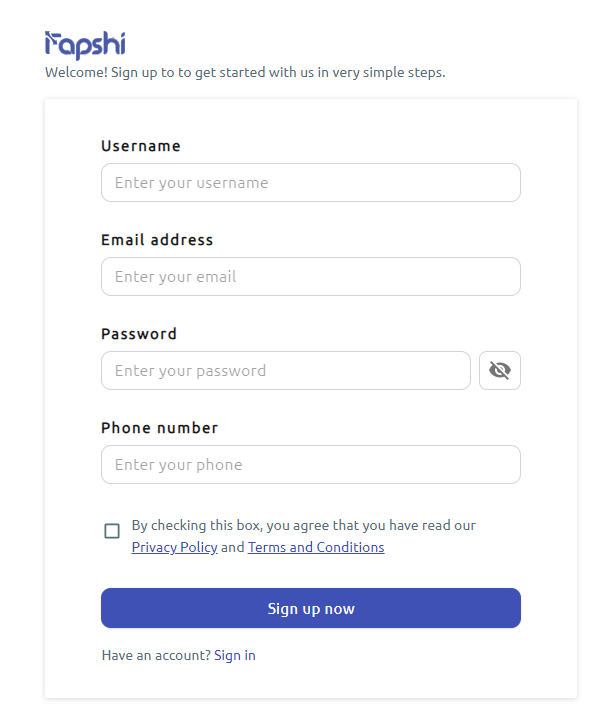
Creating an account on Fapshi is free. Click this link
https://dashboard.fapshi.com/register
to open the sign up page.
Step 1: Fill in all required details.
Note
Your username must have a minimum of 4 characters and a
maximum of 40 characters, usernames can only have letters,
numbers, underscores, hyphens, and spaces.
All payment receipts and relevant information on Fapshi
are sent to your email, so, make sure you provide a valid
email, preferably one you regularly use.
Your password must be at least six characters long.
Step 2: Click on the "Sign up now" button
You will receive an email with a code asking you to confirm
your account.
Email Verification
We noticed that for some people, the email does not appear
in their inbox. In this case, check your
Spam folder. If you're using an iPhone,
check the Junk folder. When you copy the
code, please report the email as "not spam" so that
subsequent Fapshi emails appear in your inbox instead.
Confirm your account!
It is very necessary that you confirm your email. DO NOT
SKIP THIS STEP! If you do, you will not be able to login.
Step 3: Enter the code from step 2 on the email verification
page and confirm. If successful, you can now login.
If you do not receive the code, on the email verification
page, click on "resend code" and repeat Step 3 above. After
this, you’ll be able to sign in.
Caution!
If after five attempts you are unable to sign in, you
won't be able to do so until after one hour. Thus, use the
Forgot Password option in
case you forget your password. This is to prevent phishing
attacks on your account.
How to Verify your Email on Sign Up
Video Tutorial
If you prefer video content, this guide is available on our
YouTube channel,
click here to watch it.
If you do not succeed to verify your account while creating
it, you can still do so by following these steps:
Step 1: Open
https://dashboard.fapshi.com/register
and click on "Activate your account".
Step 2: Click "Resend code" and input your email then click
confirm.
Step 3: Check your email to copy the code.
If you don't see the email in your inbox, check the Spam or
Junk folder.
Step 4: Type in or paste the code in the box and click verify.
If successful, click on the "Proceed to login" button.
Support
If after doing these you don't succeed, try again.
Otherwise, send us a
support request. Use
"Challenge while Verifying my Account" as
your subject.
Using the Forgot Password Option
To
sign in, you need your password. If you forget your password, click
the "Forgotten your password" option and insert your email. A
code will be sent to your email that you will input to change
your password.
Modifying your settings
You can modify several details on your profile. Access the
settings section by
logging into your dashboard
and clicking the "Settings" option.
Here, you can modify your personal details. However, you cannot
change your username, email, or country. To modify the other
details,
Step 1: Click the pen icon.
Step 2: Modify the necessary details and save.
Change Password
Step 1: Click the pen icon.
Step 2: Insert your old and new password and update.
Two-step Authentication
This will add a layer of security to your account. Whenever you
want to login, you will have to provide a code which is sent to
your email.
To activate two-step authentication, click the "Add two-step
authentication" button.
Step 1: After clicking the button, click "Authenticate with
your email"
Step 2: Input your email and submit.
On your next login, an email with an authentication code will
be sent to you, use that code to login.
Delete your account
You can delete your account on the Fapshi app by visiting the
profile section and pressing the delete button. This will delete
your account. Note that you will not be able to create another
account with the same username for at least 30 days!
To request that your account be deleted, do the following:
Step 1: Visit
Fapshi Support.
Step 2: Provide your email and support pin and describe your
request.
What do we delete?
All your personal data (username, phone number, names,
address, etc). However, we keep your transaction details and
email. This is to help us be accountable, for record keeping,
analytics, and to solve any issues that may arise from your
transactions.
Activate International Payments
Note
Due to compliance constraints, international payments are no
longer available. We will, however, inform you via email as
soon as we have access.
International payments are only available to verified
businesses. To Activate international payments, do these:
Step 1: Log into your dashboard and click
Settings on the menu bar.
Step 2: Scroll down to the Payment Methods section and under
Cards, click the 'Turn on' button.
Step 3: Fill in the required details and confirm.
Note
For the ID, we only accept "JPG", "JPEG", and "PNG"
picture formats; make sure your pictures are in any of
these formats. If they're not, you could use
this site
to convert them into any of the formats listed above.
Also, please ensure the pictures are clear enough such
that one can effortlessly see the details on them.
Once approved, all our international payment methods will be
available on your Fapshi checkouts.
Feedback
We usually take less than 24 hours on working days to
verify your details. However, this may vary depending on
the availability of the team. You would receive an email
stating whether the account has been approved or not.
Using the Pricing Calculator
The pricing calculator enables you to know how much you get from
product sales, invoice payments, or payment links. You could
also see how much we charge for fapshi transfers. You can access
the
pricing calculator here.
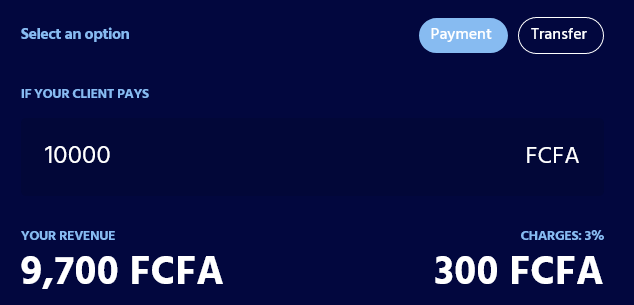
For invoices, products, store purchases, payments, select the
"Payment" option. For all payments made to you for any of these,
we'll charge 3% of the amount paid. So, to know how much you'll
earn (revenue), input your price in the box provided. The
calculator will show your revenue. You will also see the
charges, hence, you can modify your price to have the revenue
that you desire.
For Fapshi transfers, select the "Transfer" option. We charge
0.5% for every successful transfer. If you input the amount you
want to transfer into the calculator, it will tell you how much
we will deduct from your account. This amount is equivalent to
your input + charges.
Set your pin
Your pin is a five-digit code that you use to approve any amount
that should leave your account. i.e., for transfers and payouts.
To set your pin,
Video Tutorial
If you prefer video content, this guide is available on our
YouTube channel,
click here to watch it.
Step 1: Log into your dashboard.
Step 2: Click the create button and select "A pin (transfers
and payouts)".
Step 3: Input your five-digit pin and submit.
Do not share your pin!!!
Never share your pin with anyone. If someone has your pin,
they will be able to deduct money from your Fapshi account.
No member of our team will ever ask you to give them your
pin. Please beware!
Reset your pin
Video Tutorial
If you prefer video content, this guide is available on our
YouTube channel,
click here to watch it.
If you forget your pin, or are convinced that someone knows it,
you can
contact support
to give you the possibility to create a new one. Use
"Change my pin" as the subject of your message.
You will need to provide both your email and support pin in the
message field on the support form.
To get your support pin, click the person icon on the top right
of your dashboard and copy the pin.
Once your request is validated, follow the same steps in the
Set your pin section to reset your
pin.
Do not share your pin!!!
Never share your pin with anyone. If someone has your pin,
they will be able to deduct money from your Fapshi account.
No member of our team will ever ask you to give them your
pin. Please beware!
Calculate transfer amount
We charge 0.5% for transfers. You can visit the
pricing calculator
to calculate your transfer amount.
If you input the amount you want to transfer into the
calculator, it will tell you how much we will deduct from your
account. This amount is equivalent to your input + charges.
Note
We do not accept transfers less than 500 FCFA.
Inviting someone to your dashboard
Coming soon...
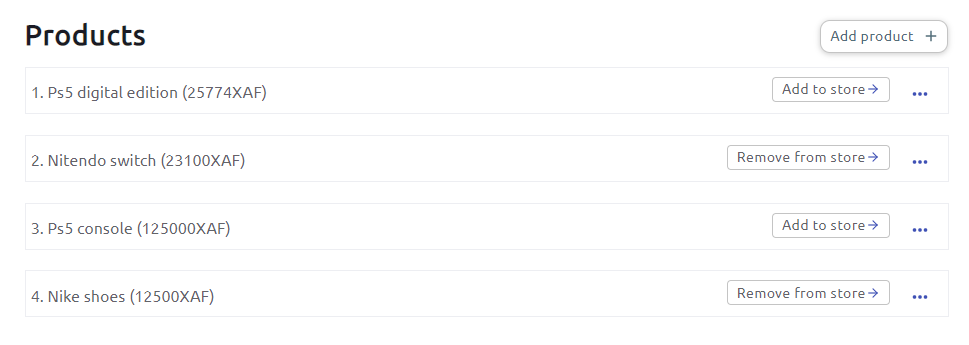
Add/remove a product from your store
Your store can only contain products from your
list of products, so, to have products
on your store, you have to add them from your list of products.
Video Tutorial
If you prefer video content, this guide is available on our
YouTube channel,
click here to watch it.
These are the steps:
Step 1: Log into your dashboard.
Step 2: Click the "More" button and select "Products".
Step 3: On each product, there's an "Add to store" button.
Click on it to add it to store.
Step 4: If you had added a product to the store, the button
will read "Remove from store", click on it if you want to
remove the product from your store.
Note
There will be no products on your store if you don't add
any. To make the most of your store, interact closely with
your customers.
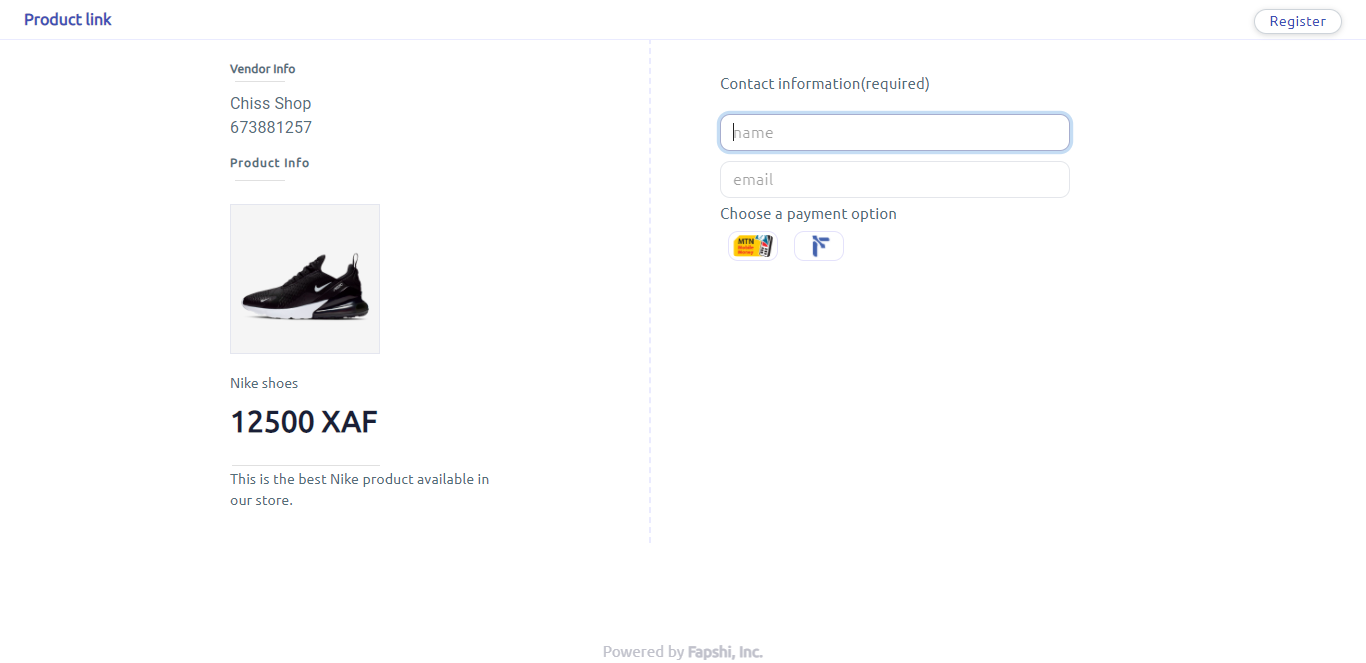
Buy a product
Buying from a product link
Step 1: Open the product link, you'll see a preview of the
product with details, and a payment portal.
Step 2: Select your payment method and pay.
When you pay, you'll receive a product purchase receipt.
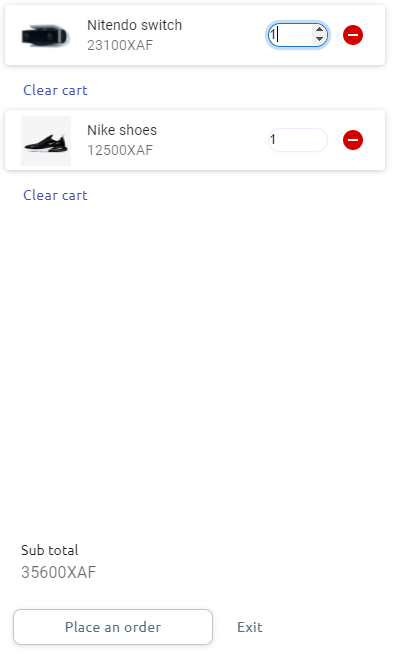
Buying from the store
Step 1: On the store, click the add to cart button at the
product you want. You can add as many items to your cart as
you need.
Step 2: Click the cart button at the top right to view your
cart.
Step 3: Select the quantity for each product.
Step 4: Click the "place an order" button.
Step 5: Fill in your details correctly and submit.
The store owner will see your order and modify it to add
shipping costs (if applicable), or make changes which you have
approved based on your discussion. Once the vendor confirms your
order, you'll receive an invoice containing your order details
and a payment link. Use this link to pay.
When you pay, you'll receive a product purchase receipt.
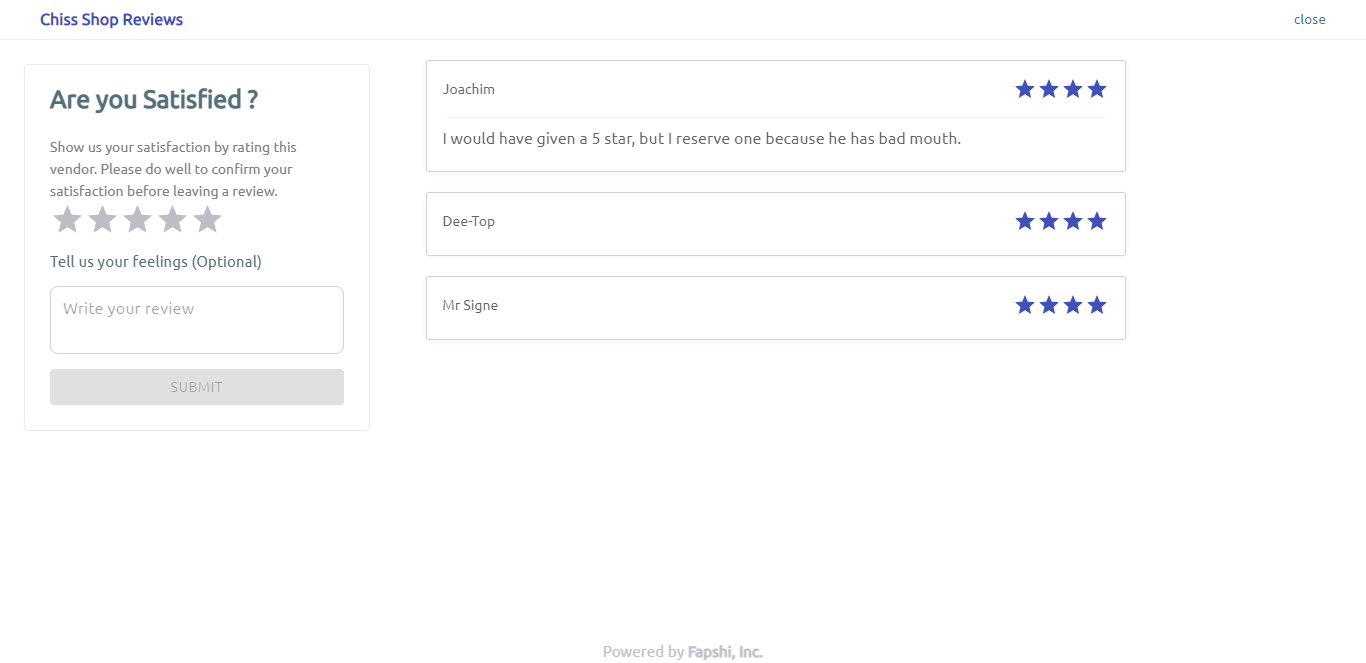
Review a store
Reviewing a store requires you to comment on how well the vendor
served you, and to provide a rating (number of stars) for the
store. This will reflect on the store's average rating.
To review a store,
Step 1: Log into your account.
Step 2: Open the store's link.
Step 3: Click the "Leave a rating" button.
Step 4: On the page that appears, click the number of stars
and write a review, then submit.
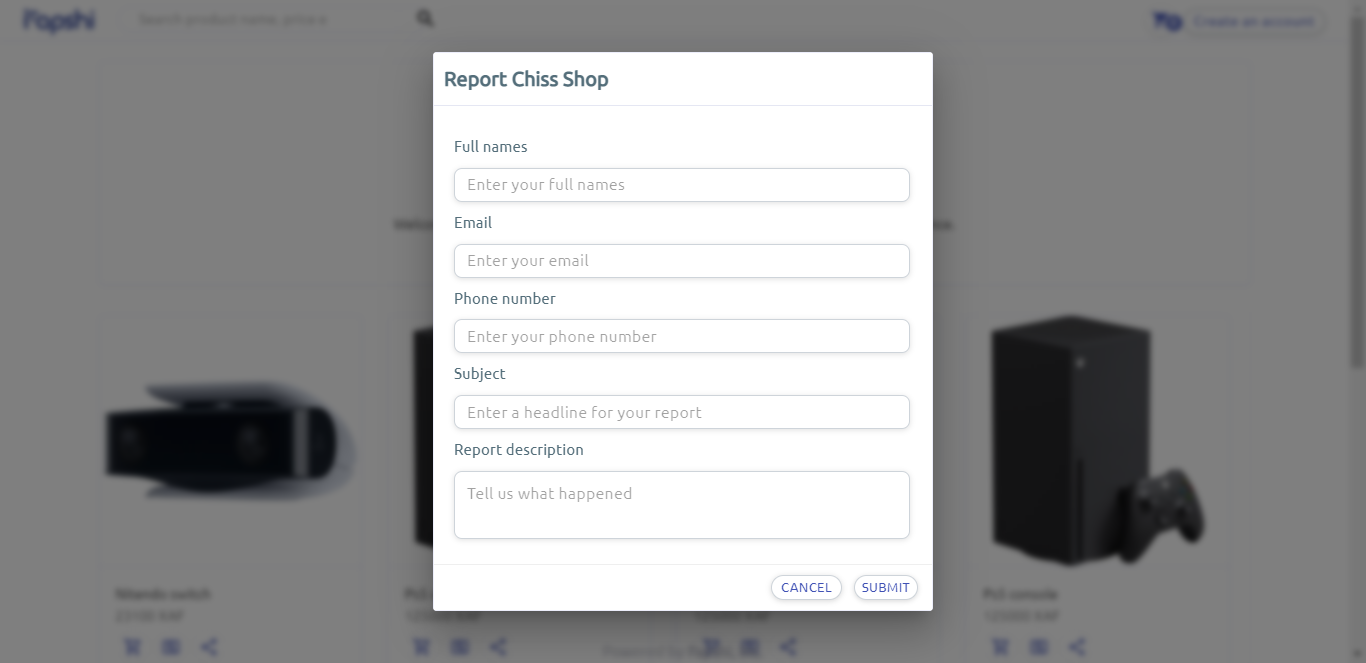
Report a vendor
If you are not satisfied with the services rendered to you by a
vendor, or your products were not shipped to you, or you have a
complaint, you've discussed with the vendor and he/she hasn't
resolved your issue, you can report him/her.
We would process your claims and do our best to ensure the issue
is resolved. Here's how you would report a vendor:
Step 1: Open the store's link.
Step 2: Click the "Report this vendor" button.
Step 3: Fill in the required details and submit.
We will process the issue and get back to you in the shortest
time possible.
Confirm an order
Clients can place orders for products from your store. You can
view these orders on the orders section on your dashboard. You
must confirm an order before the client can pay.
The order details contain the client's details, if you need to
contact them before confirming the order, do so. To confirm an
order, do these:
Step 1: Log into your dashboard, click the "More" button and
select Orders.
Step 2: Use the three dots icon next to an order to view its
details.
Step 3: Click the "confirm order" button at the top right of
the page.
Step 4: If necessary, input a delivery fee, otherwise, just
confirm.
On the order details, you'll see the client's address.
Consider it to determine the delivery fee.
An invoice containing the order details and a payment link
will be sent to your client. They can use this link to pay.
Note
After confirming an order, you cannot edit it again.
When they pay, your account balance will increase; your clients
will receive payment receipts.
Note
You can edit the order details provided you have discussed
with the client. For example, if a client wants two units of
an item, but you only have one, if the client accepts to
take the one, you can modify the order to reflect that
change. You can also add items to the order. However, do not
include things on the order which were not approved by the
client. Remember, the client could report you!
Edit an invoice
You can edit an invoice by modifying some details on it and
resending. However, you cannot change the customer's email.
To edit an invoice,
Step 1: Access your Invoices page.
Step 2: Click the three dots icon on the invoice and select
"Edit invoice".
Step 3: Modify the necessary details, save and send.
Your client will not receive a new email, so you have to remind
them to use the same link as the one in the initial invoice to
view the edited invoice (with its changes).
Note
You can only edit an invoice if the invoice has not yet been
paid for.
Duplicate an invoice
You can duplicate an invoice in case you want to send that
invoice to other customers, or you just want to modify the
details on that invoice to serve as a completely new invoice.
Here's how you'll do it:
Step 1: Access your Invoices page.
Step 2: Click the three dots icon on the invoice and select
"Duplicate invoice". This generates a completely new invoice
with the details of the previous one.
Step 3: Modify the necessary details, save and send.
The new invoice will be sent to the email you provided in the
form.
Resend an invoice
If for some reason, your client was not able to pay for your
invoice, you can resend it. Here's how you'll do that:
Step 1: Access your Invoices page.
Step 2: Click the three dots icon on the invoice and select
"Resend invoice".
The invoice will be resent to the your customer's email.
Send an invoice reminder
You can send a notice to remind your customer to pay for the
invoice. These are the steps:
Step 1: Access your Invoices page.
Step 2: Click the three dots icon on the invoice and select
"Send a reminder".
Note
You can only send a reminder if the invoice has not yet
been paid for.
An email will be sent to your customer, reminding them to pay
for the invoice.
Calculate revenue
You can calculate your revenue for payments, invoices, store
purchases, product purchases, through the
pricing calculator .
For all payments made to you for any of these, we'll deduct 3%.
So, to know how much you'll earn (revenue), input your price in
the box provided. The calculator will show your revenue.
We do not accept payments less than 500 FCFA.
Payments (payment-related questions)
Why was I debited?
Fapshi processes payments for multiple merchants. When your
debit alert reads Fapshi Inc, it simply means that the
transaction was made to a business or vendor that uses Fapshi
for collections.
Do I need to pay to
use Fapshi?
You do not need to pay to use Fapshi; all you need do is create
an account (it's free). However, Fapshi offers some services
which will deduct a minute percentage of your revenue when you
use them.
Do I need to have a
Fapshi account for someone to send me money?
No, you do not. Fapshi users can send money to people who do not
have Fapshi accounts through payouts, provided the non-Fapshi
users have an account on one of our supported operators. The
procedure is simple and seamless.
Does Fapshi keep my
money?
Fapshi does not keep its users' money. All account balances, are
kept with our partner operators. They are the ones who have
entities to keep, preserve, and secure your money.
Account
Why must I verify my
account?
Verifying your account permits us to know who you are. With
this, we can better serve you and give you personalized
experiences on Fapshi.
Why do I need to
verify my business?
We need to be sure of who you are and what your business does;
this helps us to propose the best services to you and your
clients. Our partners and regulatory bodies also require that we
know who our clients are.
General (general questions on using Fapshi)
What is Fapshi?
Fapshi is a set of tools that helps you to collect payments
easily. We have prebuilt SDKs to help you integrate our APIs on
your websites, web apps, or mobile apps. Fapshi users can
collect all forms of payment through easy-to-create,
self-managed payment links. You can equally create links for an
invoice or product, and own an easy-to-customize online store.
What do I do if I
forget my password?
If you forget your password, you can change it by accessing the
login page. There, you can click on the “forgot password” link.
Check this guide to see how to
change your password if you forget it.
What do I do if I
forget my pin?
Your pin is a code that you use for money transfers and payouts
on Fapshi; when you create an account, you'd see the option to
create this code. If for some reason you lose your code, you'd
have to submit a
support ticket.