API Credentials
API credentials are used to make requests to all Fapshi
endpoints available to developers. Failing to provide or
providing wrong credentials will therefore lead to errors being
returned in the response of your requests.
The credentials of the testing environment (sandbox) are
available to all Fapshi users (on the dashboard), however, only
verified Fapshi users
have access to the live credentials, after
creating a service.
These credentials (apiuser and apikey) can be obtained on the
Fapshi dashboard
after some prior account verification (See the
Activate your Fapshi account
section).
The credentials should be added to the header of every request
using the parameters apiuser and apikey as
shown below.
Attention!
The apikey of the live environment is given to you once and
should be copied and stored safely. However, it is possible
(and advisible) to generate a new apikey should you suspect
that your current apikey has been compromised. This will
invalidate the previous apikey.
The combination of your apiuser and apikey should be kept
extremely jealously because they essentially serve as a
username and password which are used to authenticate
developers in our system and should
in no case be shared or made public. You
bare full responsibility should your credentials be used in
a way that violates our
Terms & Conditions
or
Privacy Policy.
Base URL
When in live mode, the base URL is same for all endpoints.
However, the sandbox environment has a different base URL.
In both environments, the URL paths are the same, just the base
URL changes.
Live Base URL:
https://live.fapshi.com
Sandbox Base URL:
https://sandbox.fapshi.com
Failed and Successful Requests
If any request made to the Fapshi payment API fails, the
response will have a status code of 4XX (400, 403, 404)
depending on the nature of the error and the body of the
response will have a message parameter containing the reason for
the failure.
However, a successful request will have, in its response, a
status code of 200 and the content of its body will depend on
the nature of the request.
Live Vs Sandbox Environment
The sandbox environment is used to test or better understand the
functioning of the Fapshi payments API. Here, no real money is
involved, however, it behaves in exactly the same way as if the
money used were real. This is to help developers easily
integrate our payments API on their application while still in
development.
The sandbox or test environment works in the same way as the
live environment. However, the credentials of the sandbox
environment won’t work on the live and vice versa. Also, the
base URL of the sandbox environment is different from of the
live. See the Base URL section above.
On the sandbox, if you want to simulate payments with a local
payment method, depending on the phone number chosen, you will
either have a SUCCESSFUL or FAILED transaction status.
Numbers for Successful Transactions:
| MTN |
670000000, 670000002, 650000000 |
| ORANGE |
690000000, 690000002, 656000000 |
Numbers for Failed Transactions:
| MTN |
670000001, 670000003, 650000001 |
| ORANGE |
690000001, 690000003, 656000001 |
If you choose to pay with a number not among one of these, the
transaction status will be decided in a random manner.
For international payment methods, the following card numbers
will simulate SUCCESSFUL and FAILED transactions respectfully.
Details for Successful Transactions:
| Number |
CVC |
Date |
| 5555 5582 6555 4449 |
Any 3 digits |
Any future date |
| 4000 0075 6000 0009 |
Any 3 digits |
Any future date |
| 4000 0048 4000 8001 |
Any 3 digits |
Any future date |
Details for Failed Transactions:
| Number |
CVC |
Date |
| 4000 0000 0000 9987 |
Any 3 digits |
Any future date |
| 4000 0000 0000 0069 |
Any 3 digits |
Any future date |
| 4100 0000 0000 0019 |
Any 3 digits |
Any future date |
Note!
Moving from the test to the live environment will require
you to replace your test keys
with your
live keys and switch the base URL of your
request from the Sandbox Base URL to the
Live Base URL. If done correctly, you are
good go!
Ready to get started?
We have done all necessary to help you quickly setup
and integrate the API on your platform. Check our SDKs
and sample code to get going.
1. Generate a Payment Link
Endpoint: /initiate-pay (POST)
This request is used to generate the link to which a user should
be redirected in order to make a payment.
Parameters:
amount: required | integer >= 100
email: optional | string. If the email is set,
then the user will no longer be required to provide his/her
email during the payment process.
redirectUrl: optional | string. URL to which
your user will be redirected after completing a payment.
userId: optional | string | length between (1, 100) |
characters allowed [a-zA-Z0-9- _]. If the user making the payment is known by your system,
his/her id should be passed in, making it possible to later
query the payment history of this user.
externalId: optional | string | length between (1, 100) |
characters allowed [a-zA-Z0- 9-_]. This can be a transaction id, an order id or anything that
can be used to reconcile this payment transaction to your
application.
message: optional | string. Contains a message
describing the reason for the payment.
cardOnly: optional | boolean. If set to true,
only international payment options will be available on the
generated link. However, international payment options must have
been enabled on the service account whose credentials are used
to perform the request, else the request will fail. Check this
guide on
How to Activate International Payments.
Return:
-
If the request is successful, the response will have a status
code of 200 and its body will contain a
link and a transId variable.
The link is the URL to which the user should be
redirected in order to complete his/her payment.
transId is the id of the payment transaction and can
be used to get the status of the payment, hence, it is
judicious to store this transId on your system.
-
If the request fails, the response will have a status code of
4XX depending on the reason for the failure and a message
describing the reason for the failure.
Note!
A programmatically generated link has a validity period of
24 hours after which it is impossible to
complete a payment using the link.
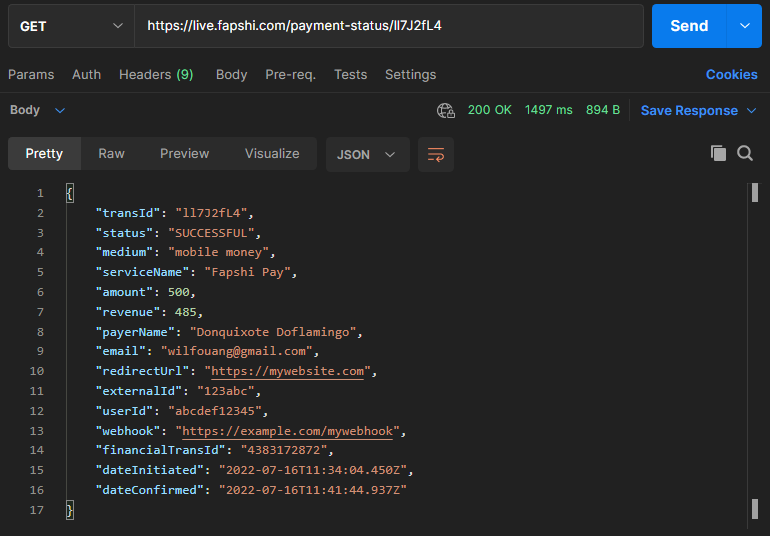
2. Get Payment Transaction Status
Endpoint: /payment-status/:transId (GET)
transId is the Id returned in the response of request
(1) above. The status of a
transaction can be:
CREATED: This means a payment attempt has not
yet been made.
PENDING: This means the user is in the process
of making a payment. Usually, the status of such a transaction
will change to SUCCESSFUL or FAILED immediately the transaction
is completed.
SUCCESSFUL: This means the payment attempt has
been successful.
FAILED: This means the payment attempt failed.
EXPIRED: This means 24 hours have passed since
the payment link was generated and no successful payment attempt
was made in that time interval OR the link got manually expired
like in (3) below to prevent
payment.
Note!
Once the status of a payment is SUCCESSFUL or EXPIRED, no
other payments can be made using its link.
3. Expire a Payment Transaction
Endpoint: /expire-pay (POST)
Expiring a payment transaction will make it impossible for a
payment to be made via the transaction link.
Parameters:
transId: required | string, this is the id returned while
creating the transaction.
Return:
If the request is successful, the body of the response will
contain the details of the payment of the
EXPIRED transaction.
Note!
If a request is made to expire an already expired
transaction, it will return an error with a 400-status code
and a message: "Link already expired.""
4. Get Transactions with the Same User ID
Endpoint: /transaction/:userId (GET)
If any of the payment requests in
(1) above contains a user
Id, then it is possible to get all transactions associated to
this user Id. This request returns an array of objects
containing the information related to the payments associated to
the user Id passed in the URL of this request.
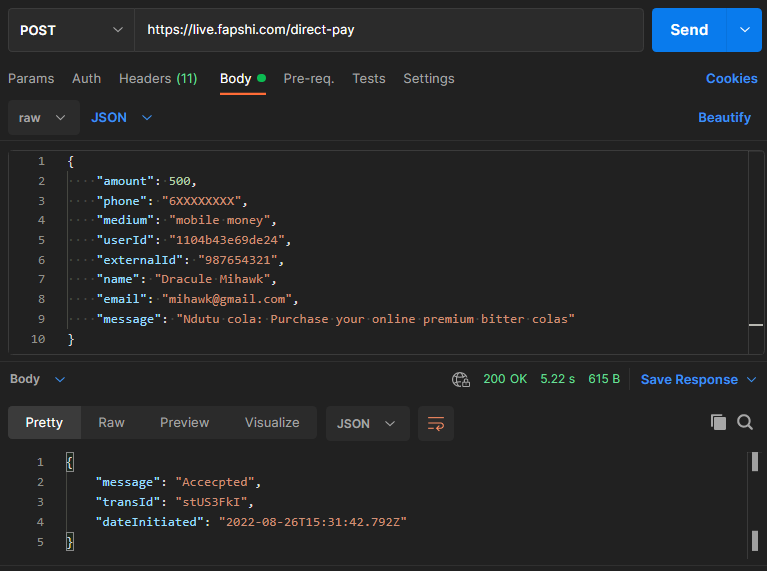
5. Initiate a Direct Payment Request
Endpoint: /direct-pay (POST)
Fapshi offers the possibility to initiate a payment request
directly to a user’s mobile device. However, the developer bares
full responsibility over the user’s payment process i.e., from
building a custom checkout form where user details are collected
to verifying the final payment status of a transaction
(SUCCESSFUL or FAILED).
This request, if successfully initiated, will directly prompt
the user with the phone number specified in the request to
confirm the transaction after which the developer will be
notified with the details of the payment via his/her webhook if
he/she had set one on his/her dashboard or will simply have to
use
(2) above
to get the transaction details.
The image below shows the sequence...
1 - An external application with API credentials initiates a
payment request to Fapshi’s API
2 - Request is validated and sent to the appropriate operator
for processing
3 - User is prompted to validate payment by entering his/her PIN
4 - User approves or declines payment
5 - Operator notifies Fapshi with status of payment transaction
6 - Fapshi notifies external application (via the app’s webhook)
with the final status of the transaction
Note!
On live mode, this endpoint is blocked by default.
Contact support
if needed.
Below are the body parameters required to perform a successful
transaction.
Parameters:
amount: required | integer >= 100, amount to be
paid by the user.
phone: required | string, phone number to which
the request will be performed e.g., 67XXXXXXX, 69XXXXXXX,
65XXXXXXX.
medium: optional | string in [“mobile money”, “orange
money”], this parameter can either be “mobile money” for MTN numbers
or “orange money” for Orange numbers. However, if the operator
the user wants to make the transaction with is not known, this
parameter can simply be omitted and Fapshi will automatically
detect and perform the request using the appropriate payment
method.
name: optional | string, name of the user
performing the payment.
email: optional | string, email of the user
performing the payment. If the email is set, a payment
confirmation receipt will be sent to this email.
userId: optional | string | length between (1, 100) |
characters allowed [a-zA-Z0-9-_], if the user making the payment is known by your system, his
id should be passed giving the possibility of later querying the
payment history of this user.
externalId: optional | string | length between (1, 100) |
characters allowed [a-zA-Z0- 9-_], this can be a transaction id, an order id or anything that
can be used to reconcile this payment transaction to your
application.
message: optional | string, contains a message
describing the reason for the payment.
Return:
-
If the request is successful, the response will have a status
code of 200 and its body will contain a
transId variable. This transId is
the id of the payment transaction and can be used to get its
status, hence, it is judicious to store this transId on your
system.
-
If the request fails, the response will have a status code of
4XX depending on the reason for the failure and a message
property describing the reason for the failure.
Note!
Direct payment transactions
cannot and do not get expired.
Consequently, their final state is either
SUCCESSFUL or FAILED.
Attention!
Make sure to take all necessary precautions to avoid the
misusage of this endpoint. Should any complain be made, your
account will be blocked as per our
Terms & Conditions
6. Search/Filter Transactions
Endpoint: /search (GET)
With the Fapshi API, it is possible to get the list of
transactions the pass some certain criteria. These criteria are
specified as query parameters in the URL of your request and are
as follows:
status: Returns only transactions matching the
specified status. It can take only the following values;
created, successful, failed and expired.
medium: Returns only transactions matching the
specified medium. It can take the following values; mobile
money, orange money and card.
name: optional | string name of the user
performing the payment.
start: A date of format yyyy-mm-dd. If
specified returns only transactions that were initiated after
the said date.
end: A date of format yyyy-mm-dd. If specified
returns only transactions that were initiated before the said
date.
amt: Stands for amount. If specified, returns
transaction matching this exact amount.
limit: This indicates the maximum number of
transactions that can be returned by a search request. It takes
any integer between 1 and 100 and defaults to 10 if left
unspecified.
sort: This specifies the order in which the
transactions should be return in the response array. It takes as
value; asc or desc (ascending and descending). An ascending
order will mean the oldest transaction in the list will appear
at the top while a descending order will mean the most recent
transaction will appear the top. If left unspecified,
transactions will appear in a descending order.
Note!
If any of the above parameters contains an invalid value, it
will simply be ignored and the request will behave as if it
was not specified in the first place. Also, the transactions
returned in the in response are in descending order of
occurrence if the sort parameter is omitted i.e., the most
recent appear on the top.
6. Get Service Balance
Endpoint: /balance (GET)
Returns the amount left in the service’s account. Does not
require any parameter.
Note!
In the sandbox environment, this balance is randomly
generated every time the request is made.
Payments (payment-related questions)
Why was I debited?
Fapshi processes payments for multiple merchants. When your
debit alert reads Fapshi Inc, it simply means that the
transaction was made to a business or vendor that uses Fapshi
for collections.
Do I need to pay to
use Fapshi?
You do not need to pay to use Fapshi; all you need do is create
an account (it's free). However, Fapshi offers some services
which will deduct a minute percentage of your revenue when you
use them.
Do I need to have a
Fapshi account for someone to send me money?
No, you do not. Fapshi users can send money to people who do not
have Fapshi accounts through payouts, provided the non-Fapshi
users have an account on one of our supported operators. The
procedure is simple and seamless.
Does Fapshi keep my
money?
Fapshi does not keep its users' money. All account balances, are
kept with our partner operators. They are the ones who have
entities to keep, preserve, and secure your money.
Account
Why must I verify my
account?
Verifying your account permits us to know who you are. With
this, we can better serve you and give you personalized
experiences on Fapshi.
Why do I need to
verify my business?
We need to be sure of who you are and what your business does;
this helps us to propose the best services to you and your
clients. Our partners and regulatory bodies also require that we
know who our clients are.
General (general questions on using Fapshi)
What is Fapshi?
Fapshi is a set of tools that helps you to collect payments
easily. We have prebuilt SDKs to help you integrate our APIs on
your websites, web apps, or mobile apps. Fapshi users can
collect all forms of payment through easy-to-create,
self-managed payment links. You can equally create links for an
invoice or product, and own an easy-to-customize online store.
What do I do if I
forget my password?
If you forget your password, you can change it by accessing the
login page. There, you can click on the “forgot password” link.
Check this guide to see how to
change your password if you forget it.
What do I do if I
forget my pin?
Your pin is a code that you use for money transfers and payouts
on Fapshi; when you create an account, you'd see the option to
create this code. If for some reason you lose your code, you'd
have to submit a
support ticket.